.jpg)
A while ago, my mom sent me a white silk scarf and some instructions on how to use Sharpie brand permanent markers and 91% rubbing alcohol to make "hand painted" scarves by drawing on the scarf and then diffusing the marker with the rubbing alcohol for a water color look. My mom tells me it makes a great project for a get together with a group of ladies. She did it with her quilting group.

I finally got around to trying it out yesterday. This is my first attempt. I think parts of it came out really well and other parts - not quite as well as I had no real feel for the process until the end.

You can buy plain white silk scarves inexpensively at DharmaTrading.com. The Sharpie markers can be found almost anywhere in a wide range of sizes and colors and the 91% rubbing alcohol can be found at any pharmacy. I also used a small misting bottle I got at a beauty supply store and a dropper for applying the alcohol. I covered the surface of my kitchen bar counter with a white trash bag to protect it--be careful as the marker is a permanent (although it cleaned off the counter with the rubbing alcohol).
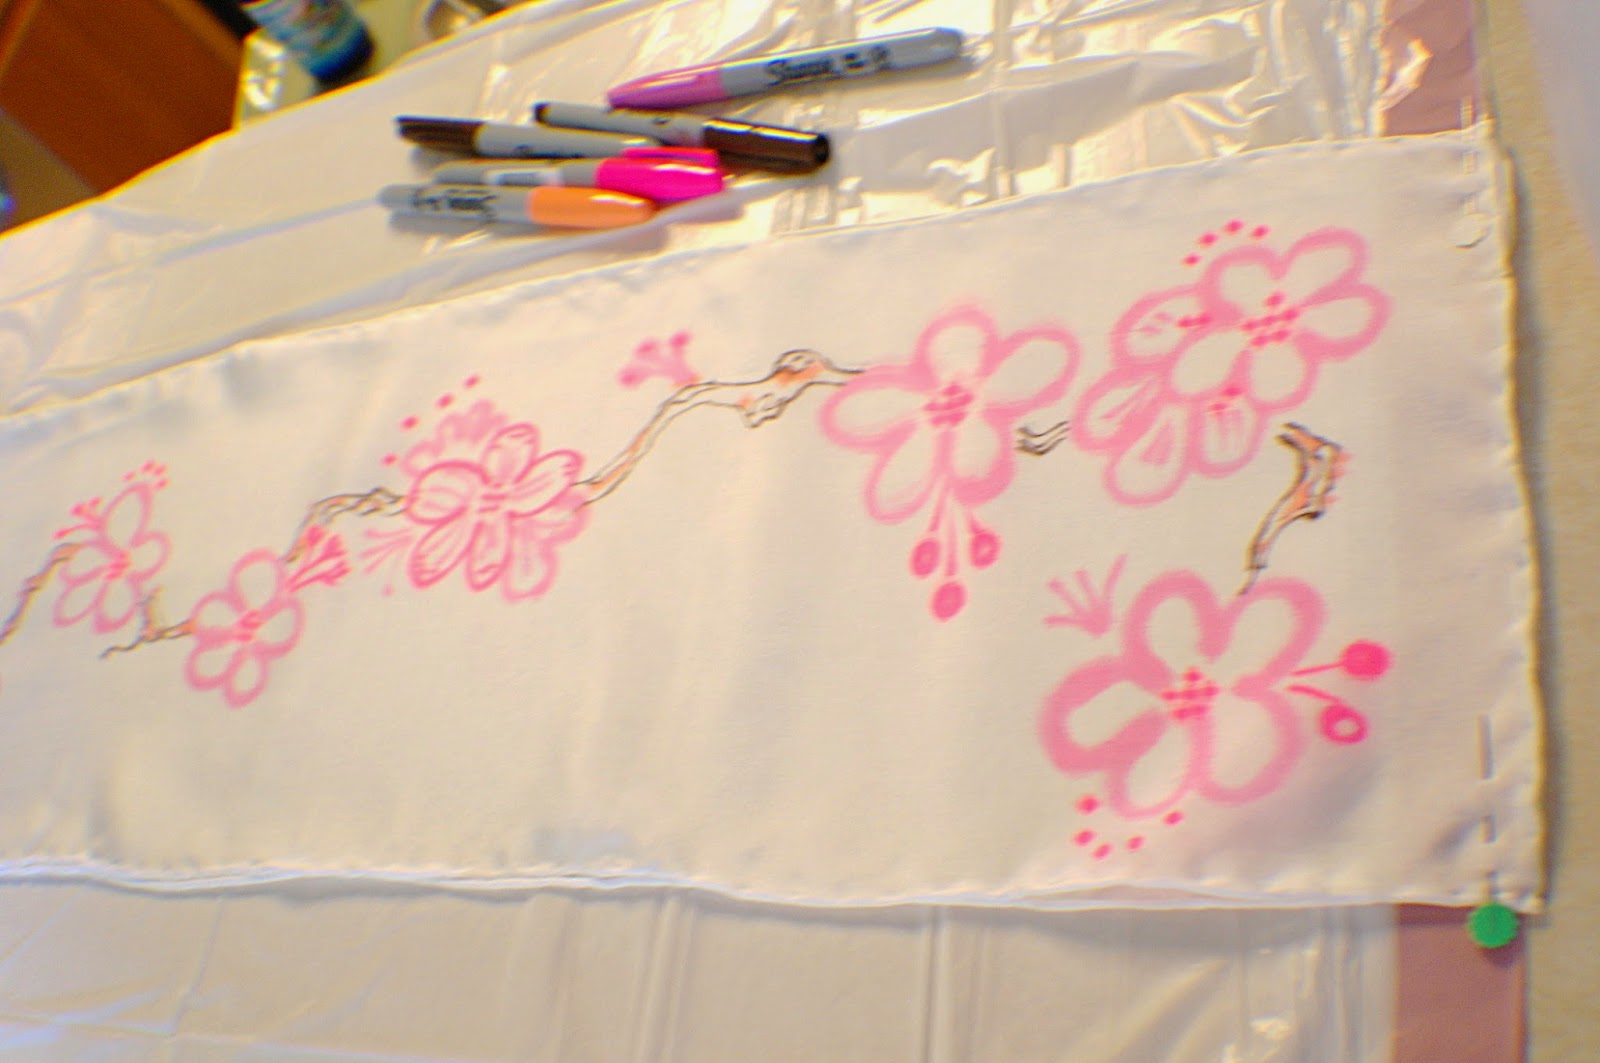
I began by doubling the scarf and drawing a simple cherry blossom pattern free hand. The scarf is very thin and if you draw somewhat slowly, the design will go through to the second layer giving you a symmetrical design. The second layer was fainter than the top layer so I re-drew over that side again in places.

After that I misted the rubbing alcohol over the design and let it dry a few minutes - it dries very quickly. I went back in and drew some more and repeated the drawing and misting process a few times.

The darker pink Sharpie was quite florescent so I decided to tone it down with some red and peach colored markers.

Ultimately, I decided that I had played around too long and too much of the design had spread to the background or smudged from the surface underneath or faded away. I could probably have sprayed those areas with rubbing alcohol and blotted the color out, but I decided with the red and peach I had added, a yellow background would look nicer than the white. I quickly drew diagonal yellow lines through the background and misted those. I liked the way that misting the background chased some of the flower and branch colors back into the middle of the design so I decided to quit while I was ahead. The whole process, including all the drying times, took about an hour. This is lots of fun and quite forgiving.

Things I learned:
No drawing experience is required if you stick to simple, abstract or geometric designs.
The slower you draw, the thicker and more diffuse the lines will be as the color flows out of the marker and into the weave of the silk
If you hold a marker in place on the silk, the color will bleed out into a cross or T shape following the weave of the silk.
If you put too much rubbing alcohol on, it will puddle underneath - which might make a nice design if you are going for that, but be careful of color from the surface below coming up onto the scarf when you apply more alcohol. You may need to find a a clean place on your surface to work.
You can always go back in and draw on top of what you have already done to add sharper details or layer in color.
You have limited control over the results.
You can use the rubbing alcohol in a misting spray bottle to chase your design around a little bit if you spray it directionally instead of straight down.
You can use tie dye type techniques of wrapping sections with rubber bands, etc with this as well.
I finally got around to trying it out yesterday. This is my first attempt. I think parts of it came out really well and other parts - not quite as well as I had no real feel for the process until the end.
You can buy plain white silk scarves inexpensively at DharmaTrading.com. The Sharpie markers can be found almost anywhere in a wide range of sizes and colors and the 91% rubbing alcohol can be found at any pharmacy. I also used a small misting bottle I got at a beauty supply store and a dropper for applying the alcohol. I covered the surface of my kitchen bar counter with a white trash bag to protect it--be careful as the marker is a permanent (although it cleaned off the counter with the rubbing alcohol).
I began by doubling the scarf and drawing a simple cherry blossom pattern free hand. The scarf is very thin and if you draw somewhat slowly, the design will go through to the second layer giving you a symmetrical design. The second layer was fainter than the top layer so I re-drew over that side again in places.
After that I misted the rubbing alcohol over the design and let it dry a few minutes - it dries very quickly. I went back in and drew some more and repeated the drawing and misting process a few times.
The darker pink Sharpie was quite florescent so I decided to tone it down with some red and peach colored markers.
Ultimately, I decided that I had played around too long and too much of the design had spread to the background or smudged from the surface underneath or faded away. I could probably have sprayed those areas with rubbing alcohol and blotted the color out, but I decided with the red and peach I had added, a yellow background would look nicer than the white. I quickly drew diagonal yellow lines through the background and misted those. I liked the way that misting the background chased some of the flower and branch colors back into the middle of the design so I decided to quit while I was ahead. The whole process, including all the drying times, took about an hour. This is lots of fun and quite forgiving.
Things I learned:
No drawing experience is required if you stick to simple, abstract or geometric designs.
The slower you draw, the thicker and more diffuse the lines will be as the color flows out of the marker and into the weave of the silk
If you hold a marker in place on the silk, the color will bleed out into a cross or T shape following the weave of the silk.
If you put too much rubbing alcohol on, it will puddle underneath - which might make a nice design if you are going for that, but be careful of color from the surface below coming up onto the scarf when you apply more alcohol. You may need to find a a clean place on your surface to work.
You can always go back in and draw on top of what you have already done to add sharper details or layer in color.
You have limited control over the results.
You can use the rubbing alcohol in a misting spray bottle to chase your design around a little bit if you spray it directionally instead of straight down.
You can use tie dye type techniques of wrapping sections with rubber bands, etc with this as well.


.JPG)


.JPG)


.jpg)